Introduction


Here I will explain how to refresh or reload webpage using Jquery in asp.net.
Description:
  
In previous article I explained
expand textbox on focus and disable right click on image using JQuery and many articles relating to JQuery. Now I will explain how to refresh or reload webpage using JQuery in asp.net.
We can refresh or reload webpage in different ways
First Method
We can refresh the page by using Meta tags like as shown below

<html xmlns="http://www.w3.org/1999/xhtml">
<head>
<meta http-equiv="refresh" content="10" />
<title>Refresh or reload web Page using meta tags</title>
</head>
<body>
<form id="form1" runat="server">
<div>
</div>
</form>
</body>
</html>
If you observe above code in header section I mentioned meta tag with http-equiv attribute this attribute will refresh the page and in that meta tag I mentioned content which is used to define time interval to refresh webpage.
First Method
We can refresh the page by using button click like as shown below
<html xmlns="http://www.w3.org/1999/xhtml">
<head>
<title>JQuery Refresh or reload web Page using asp.net</title>
<script type="text/javascript" src="http://ajax.googleapis.com/ajax/libs/jquery/1.7.2/jquery.min.js">
</script>
<script type="text/javascript" language="javascript">
$(document).ready(function() {
$('#btnClick').click(function() {
location.reload();
})
})
</script>
</head>
<body>
<form id="form1" runat="server">
<div>
<asp:Button ID="btnClick" runat="server" Text="Click" />
</div>
</form>
</body>
</html>
Third Method

Another way to refresh the page automatically using JQuery like as shown below
<html xmlns="http://www.w3.org/1999/xhtml">
<head>
<title>JQuery Refresh or reload web Page using asp.net</title>
<script type="text/javascript" src="http://ajax.googleapis.com/ajax/libs/jquery/1.7.2/jquery.min.js">
</script>
<script type="text/javascript" language="javascript">
$(document).ready(function() {
setTimeout("RefreshPage()", 10000);
})
function RefreshPage() {
location.reload();
}
</script>
</head>
<body>
<form id="form1" runat="server">
<div>
<asp:Label ID="lbltxt" runat="server"/>
</div>
</form>
</body>
</html>
Introduction


Here I will explain how to open all hyperlinks in new window using Jquery in asp.net.
Description:
  
In previous article I explained
expand textbox on focus and disable right click on image using JQuery and many articles relating to JQuery. Now I will explain how to open all hyperlinks in new window using JQuery in asp.net.

To implement this concept we need to write code as shown below
<html xmlns="http://www.w3.org/1999/xhtml">
<head runat="server">
<title>JQuery open all hyperlinks in new window</title>
<script type="text/javascript" src="http://ajax.googleapis.com/ajax/libs/jquery/1.7.2/jquery.min.js">
</script>
<script type="text/javascript">
$(document).ready(function() {
$('a').click(function() {
window.open($(this).prop('href'), '', 'height=600,width=700');
return false;
});
});
</script>
</head>
<body>
<form id="form1" runat="server">
<div>

<a href="http://www.google.com">Google</a><br />
<a href="http://www.bing.com">Bing</a><br />
</div>
</form>
</body>
</html>
If you observe above code in header section I written code to open new window whenever click on new link on webpage.

This post explains How To Create Custom Login Web Part In SharePoint 2010 For Forms Based Authentication FBA.

Before creating Login WebPart we need to setup and configure Membership Provider Database and Forms Based Authentication(FBA) In SharePoint 2010 and can optionally Allow Anonymous Access to sharepoint web application and sites collection.

1. Create Visual Web Part In Visual Studio 2010

Open VS 2010 and create new project by selecting New > Project from File Menu

Create Custom Login WebPart In SharePoint 2010 For Forms Based Authentication FBA


Choose SharePoint 2010 in left pane and select Empty SharePoint Project, name it LoginWebPart.

Select Deploy as a farm solution option from next screen and click on finish

Right click on solution explorer and select Add > New Item

Visual Web Part For Login In SharePoint 2010


Choose Visual Web Part from the list and name it LoginWebPart

2. Add Reference To Assemblies
2a. Add reference to Microsoft.SharePoint.IdentityModel.dll
Right click on Refrences in solution explorer, select add reference and browse to
C:\Windows\assembly\GAC_MSIL\Microsoft.SharePoint.IdentityModel\14.0.0.0__71e9bce111e9429c\Microsoft.SharePoint.IdentityModel.dll 

2b. Add reference to Microsoft.IdentityModel.dll
Select add reference and browse to
C:\Program Files\Reference Assemblies\Microsoft\Windows Identity Foundation\v3.5\Microsoft.IdentityModel.dll

2c. Add reference toSystem.IdentityModel.dll
Browse to C:\Program Files (x86)\Reference Assemblies\Microsoft\Framework\v3.0\System.IdentityModel.dll

2d. Add Microsoft.SharePoint.IdentityModel assembly reference in Page Directive of LoginWebPartUserControl.ascx

Assembly reference to Microsoft.IdentityModel.dll


3. Place Login Control on the LoginWebPartUserControl

HTML SOURCE
<%@ Assembly Name="$SharePoint.Project.AssemblyFullName$" %>
 
<%@ Assembly Name="Microsoft.SharePoint.IdentityModel, Version=14.0.0.0, Culture=neutral, PublicKeyToken=71e9bce111e9429c" %>
 
<%@ Assembly Name="Microsoft.Web.CommandUI, Version=14.0.0.0, Culture=neutral, PublicKeyToken=71e9bce111e9429c" %> 
 
<%@ Register Tagprefix="SharePoint" Namespace="Microsoft.SharePoint.WebControls" 
             Assembly="Microsoft.SharePoint, Version=14.0.0.0, Culture=neutral, PublicKeyToken=71e9bce111e9429c" %> 
 
<%@ Register Tagprefix="Utilities" Namespace="Microsoft.SharePoint.Utilities" 
             Assembly="Microsoft.SharePoint, Version=14.0.0.0, Culture=neutral, PublicKeyToken=71e9bce111e9429c" %>
 
<%@ Register Tagprefix="asp" Namespace="System.Web.UI" 
             Assembly="System.Web.Extensions, Version=3.5.0.0, Culture=neutral, PublicKeyToken=31bf3856ad364e35" %>
 
<%@ Import Namespace="Microsoft.SharePoint" %> 
 
<%@ Register Tagprefix="WebPartPages" Namespace="Microsoft.SharePoint.WebPartPages" 
             Assembly="Microsoft.SharePoint, Version=14.0.0.0, Culture=neutral, PublicKeyToken=71e9bce111e9429c" %>
 
<%@ Control Language="C#" AutoEventWireup="true" CodeBehind="LoginWebPartUserControl.ascx.cs" 
            Inherits="LoginWebPart.LoginWebPart.LoginWebPartUserControl" %>
 
 
<asp:Login ID="Login1" runat="server" 
           FailureText="<%$ Resources:wss,login_pageFailureText %>" 
           onauthenticate="Login1_Authenticate">
</asp:Login>


4. Go to Code behind of user control and add following reference
1using System;
2using System.Web.UI;
3using System.Web.UI.WebControls;
4using Microsoft.SharePoint.IdentityModel;
5using Microsoft.SharePoint;
6using Microsoft.SharePoint.Utilities;
7using System.IdentityModel.Tokens;


Write following code in Login1_Authenticate Event of Login Control

01protected void Login1_Authenticate(object sender, AuthenticateEventArgs e)
02        {
03            string membership = "MembershipProvider";
04            string role = "RoleProvider";
05 
06            e.Authenticated = SPClaimsUtility.AuthenticateFormsUser(new Uri(SPContext.Current.Web.Url),Login1.UserName,Login1.Password);
07 
08            if (!e.Authenticated) return;
09 
10            SecurityToken token = SPSecurityContext.SecurityTokenForFormsAuthentication(new Uri(SPContext.Current.Web.Url), membership, role, Login1.UserName, Login1.Password);
11            if (token == null)
12            {
13 
14                e.Authenticated = false;
15                return;
16            }
17            else
18            {
19 
20                SPFederationAuthenticationModule module = SPFederationAuthenticationModule.Current;
21                module.SetPrincipalAndWriteSessionToken(token);
22                e.Authenticated = true;
23 
24                SPUtility.Redirect(SPContext.Current.Web.Url, SPRedirectFlags.Trusted, this.Context);
25 
26            }
27        }


Build and Deploy Solution by clicking on Build Menu and select Deploy Solution From Visual Studio

5. Open SharePoint site in browser and login with administrator account

Click on Site Actions and Select Edit Page


Click on Insert and select Web Part from the top ribbon


Select Custom from Categories And select LoginWebPart, Click on Add and Save And Close


Hope this helps
how to clear grid view in asp.net

in vb.net
gridview.datasource=nothing
gridview.databind()


in c#
gridview.datasource=null;
gridview.databind();


clear gridview by jquery

<script src="//ajax.googleapis.com/ajax/libs/jquery/1.7.1/jquery.min.js" 
 type="text/javascript"></script>
<script type="text/javascript">
        $(document).ready(function () {
            $("#gv tr:not(:first-child)").html(""); //gv is gridview's id
            //$("#gv").html(""); 
//this will clear gridview's row including header
        });
</script>
 

Clear All Rows from GridView


gridview1.Columns.Clear();
 
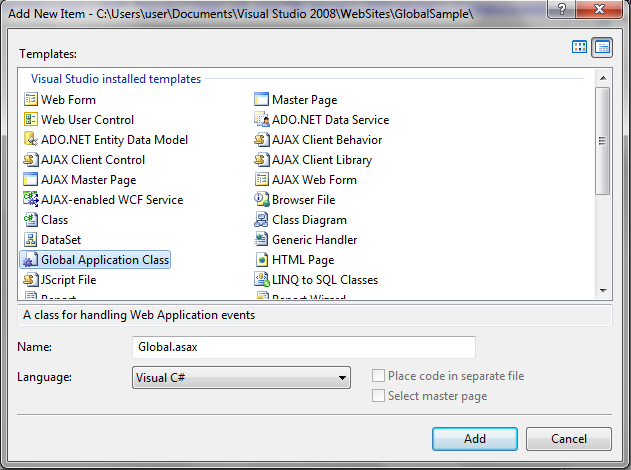
In previous post I explained clearly about Global.asax file uses and events in asp.net. Here I will explain how to add code behind file to Golbal.asax in asp.net. In one of my project I started writing code in Global.asax file but we decided to write code in Global.asax.cs file code I tried to search for that one but that is not available in our application at that I learn one thing that is we need to add Global.asax and Global.asax.cs these files to our application. For that one first right click on solution explorer and select Add New item


After that select Global Application class file and click ok now Global.asax file added successfully to our application


After add our Global.asax file to application that would be like this


And our Global.asax file contains code like this

<%@ Application Language="C#" %>

<script runat="server">
void Application_Start(object sender, EventArgs e)
{
// Code that runs on application startup
}
void Application_End(object sender, EventArgs e)
{
//  Code that runs on application shutdown
}
void Application_Error(object sender, EventArgs e)
{
// Code that runs when an unhandled error occurs
}
void Session_Start(object sender, EventArgs e)
{
// Code that runs when a new session is started
}
void Session_End(object sender, EventArgs e)
{
// Code that runs when a session ends.
}
</script>
Now our requirement is to add Global.asax.cs file to our code for that again right click on solution explorer and select Add new item another wizard will open in that select Class file and give name as Global.asax.cs and click Add


After click Add that will show one warning message like this now click yes


After adding our Global.asax.cs file we need make some changes to use Global.asax.cs file those are first remove entire script code from your Global.asax file

<script runat="server">
---------------------------
---------------------------
---------------------------
</script>
And change this line in Global.asax file to

<%@ Application Language="C#" %>
To

<%@ Application Language="C#" CodeBehind="~/App_Code/global.asax.cs" Inherits="Global" %>
Now open Global.asax.cs file and change this like

public class Global
To

public class Global:System.Web.HttpApplication

Now write the events in Global.asax.cs file and check with break point it will work for you